Dutch Oven Pot Roast: Mastering the Art of Perfect Preparation
Achieving a perfectly tender and flavorful Dutch Pot Roast requires mastering key preparation techniques, flavorful dish that delights every time succulent meat and richly flavored vegetables, is a staple in many households, especially during colder months. The secret to a successful pot roast lies not just in the ingredients but in the meticulous preparation methods that ensure every element of the dish comes together in perfect harmony.
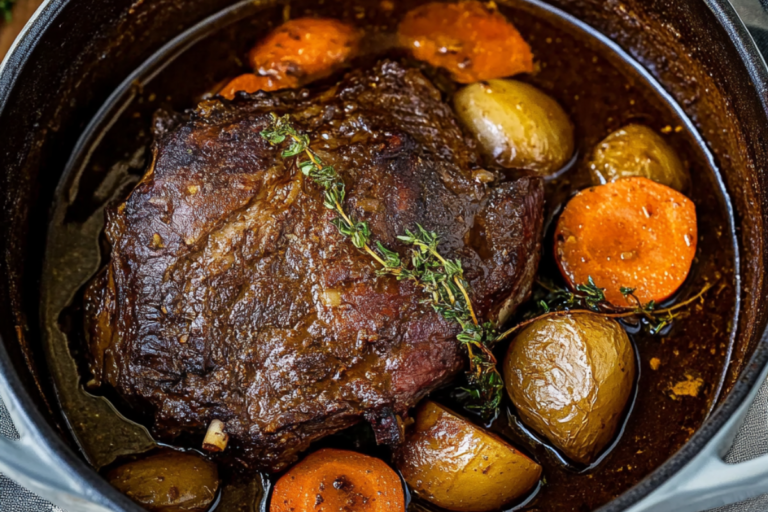
The Dutch Oven Pot Roast is a timeless dish that offers comfort and satisfaction with every bite. This meal, renowned for its tender, succulent meat and richly flavored vegetables, is a staple in many households, especially during colder months. Learn how to prepare a perfect beef stew with similar techniques.
Understanding the Key Components of a Dutch Oven Pot Roast
Before we delve into the preparation methods, it’s essential to understand the key components that make up a Dutch Oven Pot Roast. The main elements include:
- The Meat: Typically a well-marbled cut of beef like chuck roast, which becomes tender and flavorful when slow-cooked.
- The Vegetables: Commonly includes root vegetables such as carrots and potatoes, which add flavor and absorb the juices from the meat.
- The Liquid: A combination of beef broth and red wine (or a substitute), which keeps the roast moist and enhances the flavor.
- The Seasonings: A blend of herbs, garlic, onions, and spices that bring depth and complexity to the dish.
Step 1: Choosing the Right Cut of Meat
When selecting your meat, look for a piece that has good marbling—thin streaks of fat running through the muscle. This fat is essential for adding flavor and moisture during the cooking process. Discover different cuts of beef and their best uses in various recipes.
Here’s what to look for:
- Chuck Roast: This is the most popular choice for pot roast. It comes from the shoulder part of the cow, which is well-exercised, resulting in a cut with plenty of connective tissue. When slow-cooked, the collagen in these tissues breaks down, making the meat tender and juicy.
- Brisket: Another excellent option, brisket comes from the lower chest and has a higher fat content. It requires long, slow cooking to become tender, but the result is incredibly flavorful.
- Round Roast: Cut from the hindquarters, round roast is leaner than chuck or brisket. It’s a good option if you prefer a slightly less fatty pot roast, though it may not be as tender as the other cuts.
When selecting your meat, look for a piece that has good marbling—thin streaks of fat running through the muscle. This fat is essential for adding flavor and moisture during the cooking process.
Step 2: Preparing the Meat
Start by seasoning your roast generously with salt and pepper. Don’t be shy—seasoning is crucial for enhancing the natural flavors of the beef. Explore seasoning techniques for roasts to elevate the flavor profile of your dishes.
Seasoning the Meat
Start by seasoning your roast generously with salt and pepper. Don’t be shy—seasoning is crucial for enhancing the natural flavors of the beef. For added depth, consider rubbing the meat with a mixture of garlic powder, onion powder, and paprika. This will create a flavorful crust during searing.
Allow the seasoned meat to sit at room temperature for 30 minutes before cooking. This step is important because it helps the meat cook more evenly and allows the seasonings to penetrate the surface.
Searing the Meat
Searing is a critical step in the preparation of a pot roast. It involves browning the surface of the meat in a hot pan to develop a rich, flavorful crust. This crust not only adds texture but also locks in the juices, keeping the meat moist during slow cooking.
Here’s how to sear your roast:
- Heat Your Dutch Oven: Place your Dutch oven on the stovetop over medium-high heat. Add 2 tablespoons of olive oil and let it heat until it’s shimmering.
- Sear the Meat: Carefully place the roast into the hot oil. Let it sear undisturbed for 3-4 minutes on each side, or until a deep brown crust forms. It’s important not to move the meat around too much, as this can prevent proper browning.
- Remove and Set Aside: Once all sides are seared, remove the roast from the Dutch oven and set it aside on a plate. You’ll notice browned bits stuck to the bottom of the pot—these are packed with flavor and will be deglazed later to enhance the sauce.
Step 3: Preparing the Vegetables
The vegetables not only add flavor and nutrition but also absorb the rich juices from the meat, becoming tender and flavorful in the process. Check out this guide on prepping vegetables for roasting to maximize their flavor and texture.
Choosing and Cutting the Vegetables
The most common vegetables used in a pot roast are carrots, potatoes, and onions, but you can customize this based on your preferences. Here’s a basic guide:
- Carrots: Peel and cut into large chunks. Carrots add a sweet, earthy flavor that complements the beef. Large pieces prevent them from becoming too soft during the long cooking time.
- Potatoes: Peel (if desired) and cut into quarters. Starchy potatoes like Yukon Gold or Russet are ideal because they hold their shape well and absorb flavors beautifully.
- Onions: Slice into thick rings or wedges. Onions caramelize as they cook, adding a rich sweetness to the dish.
- Garlic: Mince 4-5 cloves. Garlic adds a robust, aromatic flavor that permeates the entire dish.
Feel free to experiment with other vegetables such as parsnips, celery, or mushrooms, depending on your taste preferences.
Sautéing the Vegetables
Before adding the vegetables to the Dutch oven, sautéing them in the same pot used to sear the meat is highly recommended. This step enhances their flavor and begins the caramelization process, which adds depth to the dish.
- Heat the Dutch Oven: After removing the seared meat, reduce the heat to medium and add a little more oil if necessary.
- Add the Vegetables: Start with the onions, cooking them for about 5 minutes until they start to soften and brown slightly. Then, add the carrots and continue cooking for another 5 minutes.
- Add the Garlic: Finally, add the minced garlic and sauté for 1-2 minutes until fragrant. Be careful not to burn the garlic, as this can impart a bitter taste.
Sautéing the vegetables in the same pot used for the meat allows them to pick up the residual flavors from the searing process, enriching the overall taste of the dish.
Step 4: Deglazing the Pot
Deglazing is a crucial step that many novice cooks overlook, but it’s essential for creating a rich, flavorful sauce. Understand the importance of deglazing in cooking and how it enhances your dishes.
How to Deglaze
- Add Liquid: Pour 1 cup of red wine or beef broth into the Dutch oven. The liquid will help to loosen the browned bits from the bottom of the pot.
- Scrape the Bottom: Use a wooden spoon to scrape up the browned bits as the liquid simmers. This process infuses the liquid with intense flavor, which will later permeate the meat and vegetables.
- Reduce the Liquid: Let the liquid simmer for a few minutes to reduce slightly. This reduction concentrates the flavors, ensuring a rich and robust sauce.
If you prefer not to use wine, you can substitute with additional beef broth, a splash of balsamic vinegar, or even apple cider for a slightly sweet note.
Step 5: Slow Cooking the Roast
The key to a perfect pot roast is low and slow cooking. Learn about slow-cooking methods and how they bring out the best in your meat.
Assembling the Ingredients
- Return the Meat to the Pot: Nestle the seared roast back into the Dutch oven, placing it on top of the sautéed vegetables.
- Add the Remaining Vegetables: Arrange the carrots, potatoes, and any additional vegetables around the roast. This positioning allows the vegetables to absorb the cooking juices while still getting some exposure to the heat for slight browning.
- Add the Liquid: Pour in 2 cups of beef broth, ensuring that the liquid reaches about halfway up the sides of the roast. You can also add a few sprigs of fresh rosemary and thyme at this stage, as they will infuse the dish with their aromatic flavors during cooking.
Cooking Temperature and Time
The key to a perfect pot roast is low and slow cooking. Here’s how to do it:
- Preheat the Oven: Set your oven to 300°F (150°C). This moderate temperature is ideal for breaking down the tough connective tissues in the meat without drying it out.
- Cover and Cook: Place the lid on the Dutch oven and transfer it to the preheated oven. Allow the roast to cook undisturbed for 3 to 4 hours. The exact time will depend on the size and thickness of your roast, but the goal is to cook it until the meat is fork-tender.
- Check for Doneness: After 3 hours, check the roast for doneness. The meat should be tender enough to pull apart easily with a fork. If it’s not quite there, continue cooking, checking every 30 minutes.
Step 6: Finishing Touches and Serving
While the meat is resting, you can use this time to reduce and finish the sauce. Discover sauce reduction techniques that will add a professional touch to your pot roast.
Resting the Meat
Just like with steaks, it’s important to let your roast rest before slicing. Resting allows the juices to redistribute throughout the meat, ensuring that each slice is juicy and flavorful.
- Remove the Roast: Carefully lift the roast out of the Dutch oven and place it on a cutting board.
- Tent with Foil: Loosely tent the roast with aluminum foil to keep it warm. Let it rest for 10-15 minutes before slicing.
Reducing the Sauce
While the meat is resting, you can use this time to reduce and finish the sauce. The liquid in the Dutch oven will have absorbed the flavors of the meat and vegetables, making it the perfect base for a rich, savory sauce.
- Skim the Fat: If there’s a lot of fat floating on the surface of the liquid, skim it off with a spoon.
- Reduce the Liquid: Place the Dutch oven on the stovetop over medium heat. Let the liquid simmer until it reduces by about one-third, thickening slightly.
- Adjust Seasoning: Taste the sauce and adjust the seasoning with salt, pepper, or a splash of vinegar if needed. For a smoother sauce, you can strain out the solids before serving, or blend the vegetables into the sauce for added body.
✉
Subscribe & add Flavour to your Inbox
Slicing and Serving the Roast
After the meat has rested, it’s time to slice and serve your pot roast. Here’s how to do it:
- Slice the Meat: Use a sharp knife to slice the roast against the grain. Slicing against the grain shortens the muscle fibers, resulting in more tender, easy-to-chew pieces.
- Plate the Vegetables: Arrange the cooked vegetables on a serving platter. You can keep them whole or mash some of the potatoes for a rustic presentation.
- Ladle the Sauce: Spoon the reduced sauce over the meat and vegetables. Garnish with fresh herbs if desired.
- Serve: Serve the Dutch Oven Pot Roast family-style, with extra sauce on the side for those who want it.
Tips for Perfecting Your Dutch Oven Pot Roast
Even with detailed instructions, there are always ways to elevate your dish. Here are some expert tips to ensure your Dutch Oven Pot Roast turns out perfectly every time:
- Patience is Key: Don’t rush the cooking process. Slow cooking is essential for breaking down the connective tissues and making the meat tender.
- Use Fresh Herbs: Fresh rosemary, thyme, and bay leaves add a depth of flavor that dried herbs can’t match. If using dried herbs, use them sparingly to avoid overpowering the dish.
- Deglaze Thoroughly: Don’t skip the deglazing step! It’s crucial for incorporating all the rich, caramelized flavors from the bottom of the pot into the sauce.
- Check Liquid Levels: Throughout the cooking process, periodically check the liquid level in the Dutch oven. If it looks too low, add more broth or water to prevent the roast from drying out.
- Make It Ahead: Pot roast often tastes better the next day after the flavors have had time to meld. If possible, prepare your roast a day in advance and reheat gently before serving.
FAQs about Dutch Oven Pot Roast Preparation
1. Can I make a Dutch Oven Pot Roast on the stovetop?
Yes, you can cook a pot roast entirely on the stovetop, but it requires careful temperature control to avoid burning or uneven cooking. After searing the meat and sautéing the vegetables, reduce the heat to low, cover the Dutch oven, and simmer the roast for 3 to 4 hours, checking occasionally to ensure it’s not boiling too vigorously.
2. Can I use a slow cooker instead of a Dutch oven?
Absolutely! If you prefer, you can transfer the seared meat and sautéed vegetables to a slow cooker and cook on low for 8 to 10 hours. However, the Dutch oven’s ability to develop deep, caramelized flavors through browning may be slightly diminished in a slow cooker.
3. What should I do if my pot roast is tough?
If your pot roast is tough, it likely needs more cooking time. Toughness usually means the connective tissues haven’t had enough time to break down. Return the roast to the oven or slow cooker and continue cooking until it becomes fork-tender.
4. How can I store and reheat leftovers?
Store leftover pot roast in an airtight container in the refrigerator for up to 4 days. To reheat, place the meat and vegetables in a baking dish, cover with foil, and warm in a 300°F (150°C) oven until heated through. You can also reheat in a pot on the stovetop, adding a splash of broth or water to keep it moist.
Conclusion: The Art of Dutch Oven Pot Roast Preparation
Preparing a Dutch Oven Pot Roast is as much an art as it is a science. Explore other Dutch oven recipes to expand your cooking repertoire.
By paying attention to each step—from selecting the right cut of meat to perfecting the cooking techniques—you can create a dish that’s not only delicious but also deeply satisfying. The process of slow cooking in a Dutch oven allows the flavors to develop fully, resulting in a meal that’s perfect for sharing with family and friends.